
How to Turn IICRC CEC Training Into Better Job-Site Documentation

Jul 3 / RestoreTech 360 Team

Key Takeaways

  • IICRC CEC training matters most when you turn what you learned into repeatable job notes, logs, and reports you use on every site

  • Strong job files lower disputes because drying decisions, scope changes, and final results are easy to check later

  • Clear documentation helps with insurance communication when it matches what adjusters look for: dates, readings, photos, and a short rationale for key decisions

When your CEC training ends but your paperwork chaos stays

You finish IICRC continuing education online, you pass the quizzes, and you feel ready to run a tighter job. Then the next water loss hits and your notes are split across a clipboard, a phone gallery, a text thread, and a half-filled form, so the file still turns into a scramble.

If you have to reconstruct a job file after the fact and it takes more than 20 minutes, your process is draining margin and chipping away at credibility. Adjusters and property managers do not only want the work done, they want a clear record that matches the plan, the conditions, and the outcome.

By the end of this post, you will have a repeatable documentation checklist you can run on every claim, mapped to:

  • Moisture readings and daily drying notes

  • Photo sets that show conditions and progress

  • Scope notes and change notes that explain decisions

  • Containment setup and verification

  • Odor work notes (what you used, where, and why)

  • Closeout items that prove completion and handoff

If you do one thing first, make the checklist run in the same order on every job, even small losses. Consistency is what turns training knowledge into files that are quick to review, easy to defend, and hard to dispute.

Turn IICRC continuing education credits into a job-file workflow

Also, the fastest way to get value from IICRC continuing education credits is to turn what you learned into a repeatable job-file workflow. “Better documentation” is not more paperwork, it is paperwork that holds up when questions come later.

Define “better documentation” in three plain targets:

  • Defensible decisions: you can point to readings, observations, and notes that explain why you chose a drying plan, equipment count, or containment approach

  • Complete timeline: a clear day-by-day record of what changed (conditions, equipment, scope) and when it changed

  • Consistent naming across jobs: anyone on your team can find the same item in the same place within 60 seconds, whether it is Job 0087 or Job 0194

Next, build a simple file structure and a short required-artifacts list you use on every job, and make it mirror the way you think during renewal training: assess, document, act, verify. If you do one thing, do the naming rule first, because it prevents lost photos and mismatched logs when there are two technicians and a PM touching the same claim.

Use a folder structure like this (keep it identical for every job):

  • 00_Admin: authorization, work order, customer contact sheet

  • 10_Assessment: initial inspection notes, sketch, moisture map

  • 20_Equipment_Plan: equipment calc notes, placement notes

  • 30_Daily_Logs: moisture logs, psychrometrics, site notes

  • 40_Photos: 01_Initial, 02_Daily, 03_Final

  • 50_Scope_Changes: change notes, approvals

  • 60_Reports: containment, odor treatment, completion report

Required artifacts checklist (minimum set):

  • Job info sheet with loss date, category/class, affected areas

  • Initial photos and a short “what we saw” note (5 to 8 sentences)

  • Moisture log template started on Day 1 and updated each visit

  • Daily site note with arrival time, readings taken, and what was adjusted

  • Change note any time scope or equipment changes, even if it is a 10-minute add-on

Common mistake: building a perfect template that no one uses under time pressure. Fix it by limiting the required artifacts to what can be completed in 10 to 15 minutes per visit, then add optional items only when the job is complex or the carrier is already asking questions

Moisture logs that defend your drying plan
Next, treat your moisture log like a job diary you could hand to a third party and still have it make sense. On each visit, you want enough detail that someone can see what you measured, where you measured it, and what you did with the information.

Capture the same core fields every time:

  • Location: room, wall/floor/ceiling, and a clear spot description (for example, “north wall, 18 inches above baseboard, 3 feet from doorway”)

  • Material: drywall, framing, subfloor, carpet pad, concrete, hardwood, insulation

  • Instrument: pin meter, pinless meter, thermo-hygrometer, thermal camera (name the tool type, and keep it consistent)

  • Readings: the number, the scale or mode used, and whether it is surface or in-depth where relevant

  • Ambient conditions: temperature and relative humidity at minimum, plus GPP or dew point if you track it

  • Drying adjustments: what changed since last visit (added air movers, moved equipment, opened a cavity, changed dehumidifier setting)

If you do one thing, make your locations repeatable. A common mistake is writing “living room wall” on day one and never being able to prove you rechecked the same area on day three. Use consistent reference points and take 30 seconds to note height and distance so your trend line is defensible.

Also, add decision notes that explain the why, not just the what. This is the part that turns a list of numbers into a drying plan you can defend when the adjuster, property manager, or homeowner asks why equipment stayed an extra 48 hours.

Include short notes like:

  • Targets: what you are drying to (for example, “match unaffected material” or “return to baseline readings”)

  • What “dry” means for this job: your job-specific definition (baseline comparison, stable readings over two visits, or material-specific goal)

  • Equipment decisions: why you added, removed, or repositioned equipment (for example, “removed 2 air movers after readings stabilized in Zone A”)

  • Constraints and exceptions: what might slow drying (closed-cell insulation, multiple layers, limited power, HOA noise limits) and how you adjusted

Here’s the catch: more data is not always better if it is inconsistent. Moisture logs work best when you repeat the same measurement set each visit and only add extra points when something changes. If you’re short on time, keep the full set for the affected rooms and do a smaller check on the already-dry areas to confirm they stayed stable.

Photo documentation that proves conditions and progress

Next, photos stop being “extra” when each one answers a claim question like: what was damaged, what was done, and when it changed.

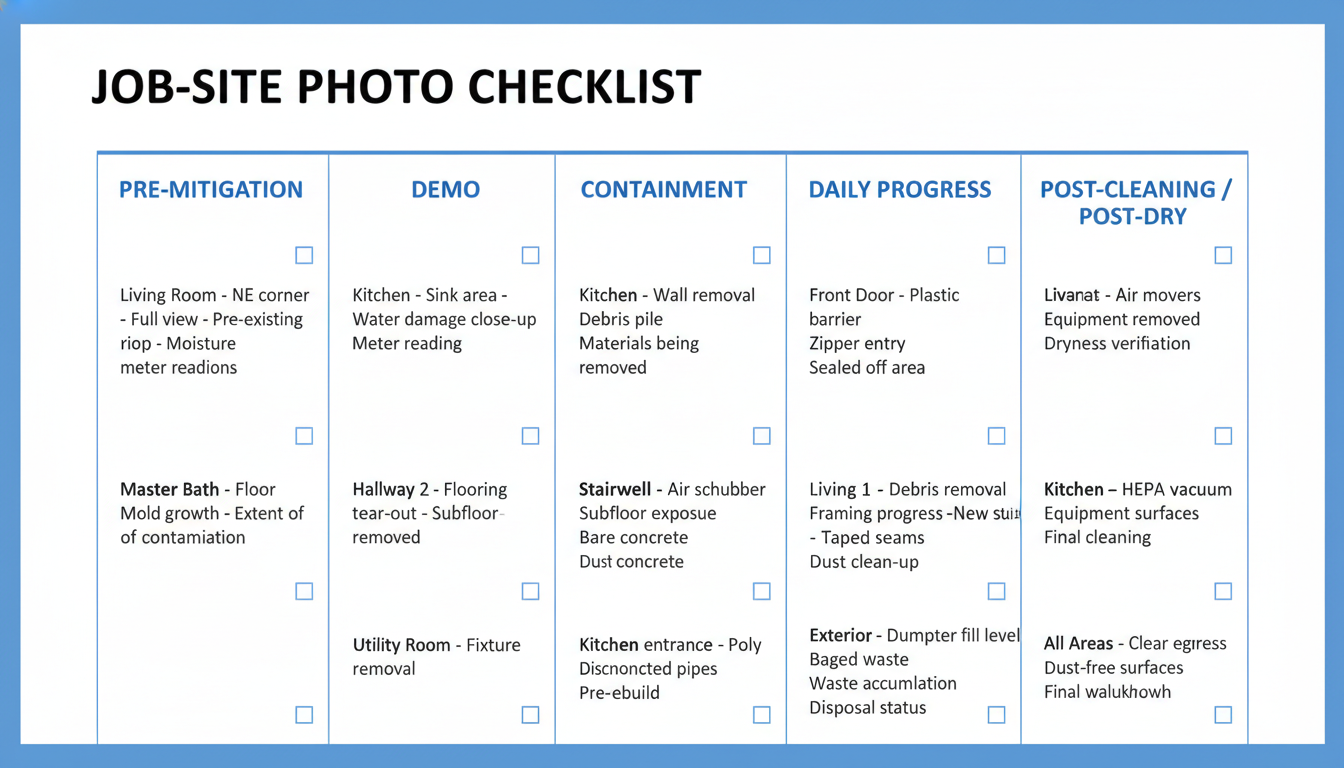
A simple way to stay consistent is to build a required photo list by phase, so every job file tells the same story even when crews rotate or the job stretches over 5 to 10 days.

Use a phase-based list like this:

  • Pre-mitigation: wide shots of each affected room, close-ups of visible damage, and one photo of your first readings on the meter display

  • Demo: each removed material area (before and after), plus debris bagging or disposal staging if it supports scope

  • Containment: barriers, negative air setup, and manometer or airflow reference if you have it

  • Daily progress: dehumidifiers and air movers placement plus one “same angle” shot per key room each day

  • Post-cleaning and post-dry: cleaned surfaces, final equipment removal, and final “dry standard met” evidence (meter display plus location)

If you only do one thing, repeat 2 to 3 “same angle” photos daily in the rooms that drive the drying plan, because they create an easy before-and-after sequence.

That said, photos only help if someone else can understand them without you on the phone. Use consistent labels on every photo (in the filename, caption, or your app notes), and keep them short:

  • Room: “Kitchen”, “BR2”, “Basement storage”

  • Direction: “north wall”, “toward hallway”, “ceiling above sink”

  • Detail shot: “baseboard gap”, “buckled laminate”, “insulation cavity”

  • What it proves: “pre-existing rust”, “containment intact”, “daily drying progress day 3”, “post-cleaning complete”

Common mistake: taking close-ups without a context shot. Fix it by taking a quick set of three: one wide shot, one mid-range, one close-up of the detail you need to prove.

In practice, the tradeoff is speed vs completeness. This approach works best when the job has multiple rooms, multiple trades, or a long drying timeline, because photos become the timeline. It fails when you take too many unlabeled photos, since reviewers cannot tell which room is which.

If you’re short on time, skip “nice-to-have” angles and focus on:

  • One wide shot per affected room per phase

  • 2 to 3 repeated “same angle” daily shots in the most affected areas

  • One clear meter display photo tied to a specific location at the start and at completion

Scope notes and change notes that prevent disputes
Also, the fastest way to end up in a disagreement is to let “scope” live only in someone’s head. Write scope notes like a third party will read them later, because they might: an adjuster, a GC, or a reviewer who was never on site.

If you do one thing, make your scope note answer four questions in plain language: what was affected, how much, what you could not do, and what access you had. For example, “Affected: drywall and baseboard in 2 bedrooms (north wall). Quantity: 24 linear feet baseboard removed, 180 sq ft drywall cut 12 inches high. Constraints: hardwood floor protected, no demo behind built-ins. Access: occupants home after 5 pm only, key code required.”

Here’s why change notes matter: job conditions change, but memory changes faster. A simple change note with a timestamp can show that you acted based on new information, not guesswork.

Document changes with a timeline that tracks what happened and when:

  • Discovery: what you found, where, and how (for example, “Day 2, IR camera anomaly at living room ceiling, confirmed wet with meter”)

  • Customer approval: who approved, how (text, email, signed), and any limits (for example, “Approved opening 2 test holes, no contents moved”)

  • Insurer notification: when you notified and what you sent (photos, readings, sketch), plus any response

  • Work performed: what you actually did, with quantities and dates (for example, “Day 3, opened ceiling 3 ft x 6 ft, removed 12 in insulation, set 1 air mover”)

Common mistake: writing “change order approved” with no details, then arguing later about what was included. Fix it by adding one sentence that ties the approval to a measurable action, quantity, or area.

Containment, odor treatment, and completion reports that close the loop

So you can avoid a last-minute scramble, write these notes as part of the work, not as an afterthought. The goal is simple: if someone opens the job file 30 days later, they can see what you isolated, what you treated, and what “done” meant on that day.

Containment notes that show you controlled risk

Also, containment documentation works best when you record measurable checks, not just “set up containment.” A common mistake is listing materials but skipping verification, which makes it hard to defend why unaffected areas stayed clean.

Include these specifics (2 to 5 minutes to capture at setup, then quick checks):

  • Containment type: critical barrier, zipper door, full enclosure, or source capture

  • Negative air use: number of air scrubbers, approximate CFM setting, exhaust path, and where the filtered discharge went

  • Pressure checks: how you confirmed negative pressure (for example, manometer reading, smoke pencil, or tissue test) and how often you rechecked (for example, each shift)

  • Protection of unaffected areas: floor covering, tacky mats, return-air protection, and how you managed traffic flow

  • Any constraints: “No exterior exhaust allowed, routed discharge to adjacent room with HEPA filtration”

If you do one thing, record the pressure check result and the recheck timing. That single line often answers the dispute: “How do we know containment was actually working”

Odor treatment notes that prove you treated the source, not the symptom

Next, odor treatment notes should read like a mini experiment: identify the source, choose a method, wait the right amount of time, then verify change. This fails when the deodorizer gets documented but the source remains, which is when odor returns after the customer moves furniture back.

Use a simple template that any tech can follow:

  • Source identification: what you think is causing odor and where (for example, wet pad by closet wall, smoke residue in HVAC return)

  • Product and method: fogging, hydroxyl, thermal deodorization, topical, duct cleaning, sealant, or removal and replacement

  • Dwell time and conditions: start and stop times, doors closed or open, and whether HVAC was on or off

  • Verification: who checked, when, and what improved (for example, “odor reduced from strong to faint at entry after 45 minutes”) plus any instrument reading if you use one

If you’re short on time, skip long narratives and capture: source, method, dwell time, verification. Four short lines beat a vague paragraph.

Completion reports that make “done” measurable

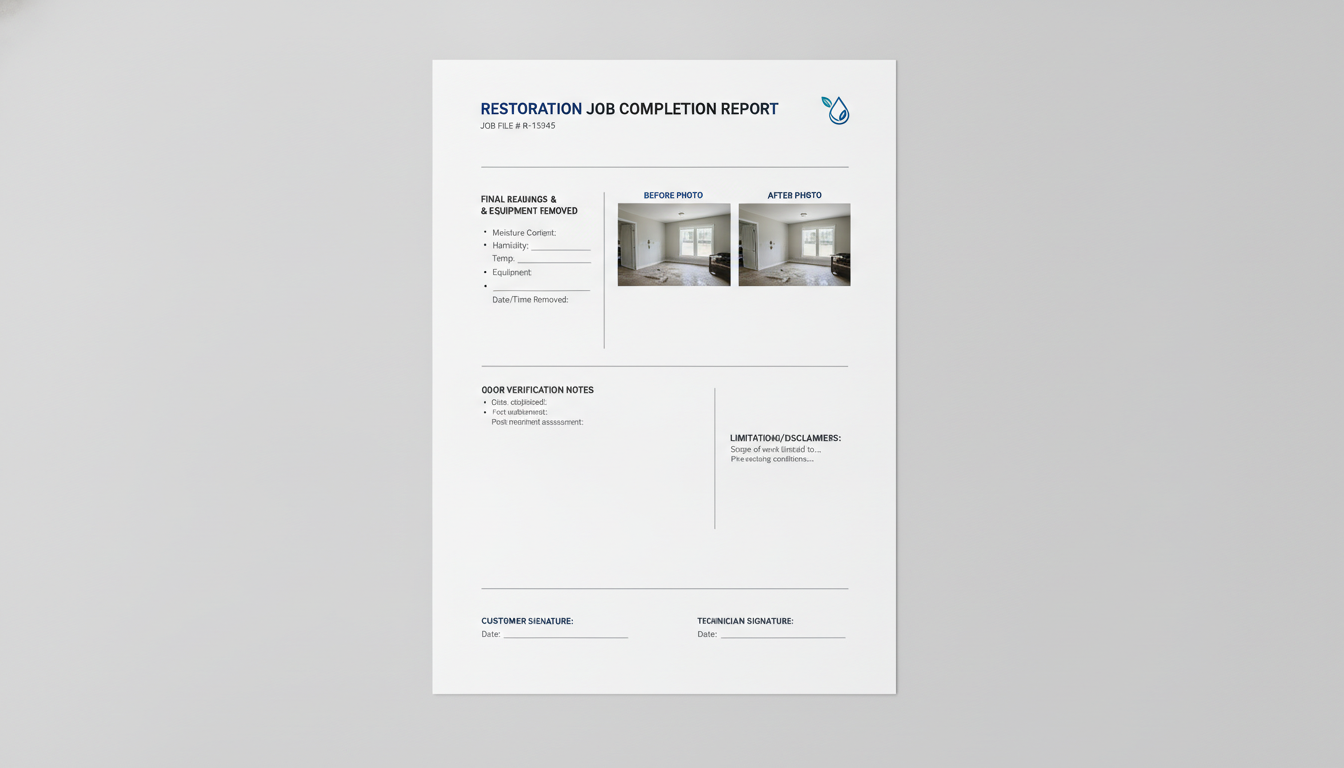
That said, the completion report is what closes the loop for the customer and protects you after you leave. It works best when “done” is defined using final readings and clear limitations, and it fails when you only write “job complete” with no conditions attached.

Completion report essentials to include on one page:

  • What “done” means: drying goal met, cleaning complete, containment removed, and equipment picked up

  • Final readings: last moisture checks (include the material and location) and a final ambient snapshot (temperature and RH)

  • Photos: final condition of key areas (for example, affected room, containment boundary, and any removed materials)

  • Remaining limitations: what you could not verify or access (for example, “wall cavity behind built-in not opened at owner request”)

  • Customer acknowledgement: who walked the job with you, date/time, and signature or written confirmation

Before/after example of a tight “done” statement:

  • Before: “Area dry, deodorized, customer happy”

  • After: “Drying goal met on affected baseboard and drywall; final checks recorded at pickup. Odor source treated at closet pad with topical and removal; improvement verified at exit. Owner declined removal behind built-in, noted as a limitation and acknowledged in writing”

Closing remarks

So when the job gets messy and the timeline gets tight, you need a simple rule that holds up under pressure: “If it isn’t documented, it didn’t happen.” The goal is not more paperwork, it is fewer callbacks, fewer disputes, and a job file that tells the same story your crew would tell on site.

That said, you do not have to fix everything at once. Pick the one part of your job file that causes the most rework today and standardize it first:

  • Readings: one log format, same intervals (for example, morning and end of day), same naming for rooms and materials

  • Photos: a set list (arrival, containment, equipment placement, daily progress, final), with a quick label rule tied to room names

  • Scope changes: one change note template, written the same day, signed or acknowledged before work continues

  • Closeout: one completion checklist that confirms what was done, what was verified, and what the customer received

Which part causes the most rework for you right now, and what will you standardize first on your next job?

Earn IICRC CECs online, then put them to work

FAQ

How many photos are enough for an insurance-friendly job file?

Aim for 25 to 60 photos for a typical residential loss. Cover pre-work conditions, equipment placement, containment, daily progress, and post-work results. Works best when photos are time-stamped and labeled; fails when you only shoot “after” photos.

What moisture log details matter most during an adjuster review?

Record date/time, meter type and setting, material tested, exact location, initial and daily readings, and your drying goal. If you do one thing, log the same points every day. A common mistake is moving test spots without noting it.

How should I document odor treatment so it’s defensible and repeatable?

List the odor source, treatment method, product name, dwell/airing time, equipment used, and verification steps. Note each application time and any re-treat triggers. If you’re short on time, document source removal plus one measurable verification step.

What belongs in a completion report for water, fire, and odor jobs?

Include a short timeline, scope performed, drying/cleaning targets and final readings, equipment days, photo set summary, materials removed, and customer sign-off. Add a brief “open items” note if anything remains. Keep it consistent across job types.